Showing posts with label Baby. Show all posts

Friday, August 23, 2013

A Fishy Wall Hanging

The Project
I made this framed wall hanging of my nephew, Fisher, eating fish for the first time. His reaction was a happy thumbs up. Since his name, the food and baby shower tag (orange fish) are all fish related, I chose an underwater theme. 


The Sketch
Today is my last day as a guest designer with Sketches in Thyme. I was given this 2 paged sketch to work with. A great way to design a horizontal wall hanging is to use a 2 paged sketch as the base. 

Variations on Sketch #121
  • I only had 3 photos of Fisher instead of the 6 photos in the sketch. Also for a wall hanging, I wanted larger photos. As a solution, I took the larger background patterned paper block and made that the photo block.
  • I took the row of photos and made that a strip of patterned papers. 
  • I used a tag from his baby shower as the journaling and moved that to one corner as an embellishment cluster. 

The Details
I had a picture frame meant for a collage of pictures. I used an X-Acto knife to cut out the central portion of the mat so I ended up with just one central rectangle. The rectangular space was much wider than 12 inches across so if I used two pieces of paper in the background, there would be an obvious vertical seam. My solution was to make my own background design. I sprayed some Dylusions Ink Sprays in blues and yellow on the cardboard backing that was already in the frame. I then painted on a wavy design with some blue craft paint. 


To build upon my background, I placed the photo block on top. Then on top of the photo block, I added a row of 1" squares. Like with tiling a floor, I found the middle of space and adhered the squares starting from the center. That way the squares would end up evenly spaced on both sides of the frame. 


Here is a look at the title section. 


Here is a look at the journaling cluster. I used some clear pearls for air bubbles along with adding some smaller dots with a Pearl Pen. This set of fish is from a different company than the ones by the title, so to unify them, I later added some goggly eyes to these too.


Supplies
Frame: Columbia
Patterned Paper: Fancy Pants, Little Yellow Bicycle, My Mind’s Eye
Alphabet Stickers: Colorbok, Doodlebug Design
Felt Stickers: Sassafras, Just Brads & Eyelets
Brads: Just Brads & Eyelets
Jewels: Kaisercraft
Craft Paint: DecoArt
Ink Spray: Dylusions
Ink: Prima Marketing
Dimensional Ink: Pearl Pen by Viva Decor


I'm entering this in:
Simply Create Too: Challenge #44 For a Child
Crafts-Too Challenge You: Summer Days, Beach Colors

Thanks so much for swimmin' by,

Tuesday, August 21, 2012

Scraplifted

I previously made this layout for Paper Made Bakery, which you can read more about here. A scrapper, besskin,  saw it on a 2Peas gallery and asked to post it on her blog feature "Scraplift Tuesday". I was totally honored that she asked. 


Here is her version. Isn't it totally darling? I would never have known it was based on my layout if she didn't tell me. 


Thanks so much for stoppin' by. I'll have a new card to reveal on Thursday. 

Wednesday, August 1, 2012

Paper Made Bakery: August Reveal + Blog Hop + Giveaway!

The Hop:
Welcome to Paper Made Bakery's August release blog hop as brought to you by a new design team! If you've just arrived from Wida's site, then you've come to the right place. If you would like to start from the beginning, please hop on over to Paper Made Bakery's blog. If you are lost, this the blog hop order:

Michelle McClure (←you are here)

The Kit:
August's Fresh Baked Kit entitled Garden Art features bright, graphic designs from Christy Tomlinson's She Art line by Pink Paislee and cute garden images from Lawn Fawn's Flutter By clear stamp set. I just love the bold colors and design in this month's kit!


PMB August's Fresh Baked Kit
The Reveal:
I like to start each month by making a layout with my Fresh Baked kit. Since the patterned papers are 6 x 6" and the white cardstock I added is 12 x 12", I'm always looking for ways to integrated the two sizes. I was thinking that quilts use smaller blocks to build up to the larger whole so I went with a quilt theme for this layout. 

Cathedral Quilt Layout


The Details:
I've made a patchwork quilt design before and wanted to try a new quilt pattern. I really like the look of a cathedral quilt so I replicated that design. 
Actual Cathedral Quilt
Since I decided upon a quilt pattern, I continued the theme by stitching all my components together at the end with a sewing machine. 

For my title block, I used the manilla tag from the kit and cut out some of the words with my Silhouette Cameo. It was easier for me to use the negative space backed with patterned paper as opposed to cutting little patterned paper letters and then gluing them onto the tag. I hand-stitched one of the words to continue the quilt theme. I also used part of two of the Christy Tomlinson rub-ons as a finishing touch. 


The patterned paper quilt blocks, title block tag, ribbon, buttons with string (untied from the tag) are all from the kit. I added one piece of white cardstock, thread for sewing and floss for hand-stitching. The sewing and stitching are optional, you can always draw in stitching lines or skip these steps. 

The Tutorial for One Quilt Block:
Here are some guidelines to making your own cathedral quilt block.

1. Cut a circle in the size you need along with a square that will fit to the edge of the circle. I punched out a 2.5" circle and the corresponding square that fits is 1.75". The circle will be your quilt block, the square is your reuseable template.


 2. Place the square in the center of the circle and trace along the four sides.

3. Score along the four lines.

4. Fold along the score lines toward the center of the circle. You can leave the four flaps loose or you can adhere or sew them down for a flatter look. This is your finished block. Repeat the steps for the number of blocks you need.


5. I measured out the space on my layout that I wanted to fill. I determined where my photo and title would go and calculated how many blocks I needed in the remaining space. This way I wouldn't have to waste time making extra blocks. 


The Giveaway:
As a way to say thank you for participating in today's blog hop, Paper Made Bakery is giving a  goodie bag to one lucky participant. You can enter by using the Rafflecopter widget below. The giveaway will end at midnight on Friday, August 3rd and the winner will be posted on PMB's blog on Saturday. 


Good luck to all! Your next stop is Lisa's blog. Remember there are daily inspiration projects and tutorials on the PMB's blog all month long. 


a Rafflecopter giveaway

Wednesday, March 21, 2012

Pages Reveal: Oh Baby Baby Layout

The Reveal
Since I was given Authentique's "Miracle Girl" collection to work with this month from Pages from the Heart, I really wanted to utilize all the cute baby die cuts and stickers that are included in the kit. I decided to create a baby girl layout. I had some photos of my niece when she was dressed up for Christmas morning, and a more casual photo when we both showed up wearing animal ears.  

Oh Baby Baby layout
Last month I made a wall hanging for her using this kit with some of the same photos which got picked up Create Magazine. This time, I wanted to make something featuring Zemira that I could keep so I thought a layout would be nice. 


There are so many pieces in the kit, that I've made 5 projects already and I still have a lot of supplies left. You've seen four of them already, and the last one will be revealed soon. 

Supplies:
Featured Collection: Authentique's "Miracle Girl"
Cardstock: Bazzill
Patterned Papers: Authentique
Letter Stickers: Authentique
Die Cuts: Authentique
Ribbon: May Arts
String: Making Memories
Eyelets: Making Memories
Eyelet Setter: Making Memories
Pen: Pentel
Stamps: Inkadinkado
Ink:ColorBox, Ranger
Glossy Accents: Inkssential
Thread: Coats & Clark
Other: sewing machine

The Details:
One component of our assignment this month was to use handmade embellishments in our projects. I made a clothesline of baby clothes by first setting two eyelets on my layout and running some pink string through the holes. I stamped the same image twice onto two different patterned papers and paper pieced them together to create different colors on the same item of clothing. I also cut out the safety pins from a die cut in the kit and glued it on top of the onesie to look like it is holding the onesie onto the clothesline. I added some Glossy Accents to make it look like an epoxy sticker.

Handmade Embellishments
For the title, I used a die cut as the main title block. I added a smaller die cut to accent it. I used some alphabet stickers for the subtitle. To match my subtitle of "10 finger 10 toes", I used my pinkie finger and stamped along one side of the title. It looks like part of the vintage paper, but it is a subtle way to embellish a page and further play with the theme of 10 fingers and 10 toes. 

Title and Pinkie Stamping
For the journaling I mixed and matched some die cuts with hand journaling, and balanced it on the opposite corner from the title. I basically framed everything in and made a central square grouping of elements. I border punched the outermost paper to give it a ruffled edge, matted the layout in gray and machine stitched a zig zag pattern to finish things off. 


Hope you liked the first baby girl layout that I've ever scrapped. 

Thanks so much for stoppin' by,


Saturday, February 18, 2012

Pages Reveal: Baby Banner

The Reveal:
The February assignment for Pages from the Heart was to create a banner project. The one I originally made was picked up for submission, so I had to retrieve my project from the store. I found out that the magazine will keep it for 6 months before they return it so I decided to make another one for Pages. Without further ado, let me introduce my little niece, Zemira, to the scrapping world.


 I've made a lot of projects featuring my nephew Isaiah, like this one of him falling out of the car card. I didn't want his little sister to feel left out so I made a wall hanging for her new room using her Christmas morning photos. Good thing she was wearing a pink and brown coat which matched my collection colors.

Isaiah's Card
The Details:
I was given Authentique's "Miracle Girl" kit which is a 700+ piece collection with a baby girl them. There is also a boy version with blues and greens. This was actually the fifth project I've made from the same kit. You don't have to use it for baby projects as I made a more masculine card for Kevin from this kit. 


Supplies:
Patterned Papers: Authentique
Die Cuts: Authentique
Stickers: Authentique
Mist: Tattered Angels
Jewels: Making Memories
Ink: ColorBox, Ranger
Twine: The Twinery
Liquid Adhesive: Fabric-tac by Beacon
Clothespins: Lowe Cornell (Jo-Ann Crafts)
Other: buttons, string, frame

As I was pondering the banner assignment, I thought that a clothesline looked similar to a banner. I also starting imagining cute baby clothes being hung on the line with clothespins so I just went with that idea and hung Zemira on the line.


I anchored my three photos of unto hand cut tags. I decorated the tags with twine, buttons, die cuts and stickers. I had previously purchased some wooden clothespins from a craft store, so I used that to hang the tags onto a piece of brown string. To fill in the space in between the tags, and to bring in more of a banner feel, I hand cut some little flags, glued on a few buttons and attached that to the string.


For the frame, I went to a thrift store and purchased a framed wall art which was still new in package. I was looking for something cute or elegant in a bright white but could only find a rustic brown in the size I wanted. I decided to use the best available find and make it work. I took out the central art piece which was a pineapple print and cut out part of the central mat so I would have a bigger space to work with. The large mat that was left was an unappealing beige color, so I took my Tim Holtz Distress Ink and rubbed it over the mat to create a woodgrain look which matched the rustic charm of the frame. I also sprayed a bit of glimmer mist onto the mat to add a bit of shimmer and femininity.


Be creative and work with what you have, you might be surprised by what you can achieve.

Thanks for stopping by,

Monday, May 23, 2011

Pop-up Card Tutorial

I received a request from Pages from the Heart to write up a tutorial about a pop up card I made for them that is currently displayed in the store. I remade the same type of card but changed up the look to give to my brother-in-law at his big 4 uh-oh birthday bash this weekend. 


Pop-up Card Tutorial:
This is a great card if you want to give something a little different as a gift to your friends. It mails flat inside a standard A-2 size card envelop but then pops up with its own built in stand. It makes a perfect housing for a photo, gift card or sentiment. The card construction idea came from Splitcoaststampers which you can also access here.

The card can pop up with its own stand.

The card can also be folded completely flat.

1. Pop up tag - Construct a tag starting with a piece of paper measuring 2-3/4" x 5-1/4". From there you can be creative using more papers or other fun elements from your stash to decorate your tag. Keep in mind the bottom one inch of your tag will be covered so don't decorate that area. Also, try not to use heavy embellishments that will make the card lean back too much and therefore become unbalanced.


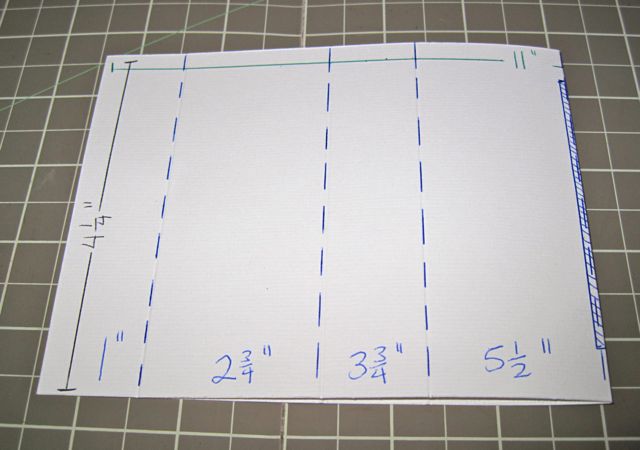
2. Card base - This is the trickier part of the card, so please measure and cut carefully for this section. Cut the paper you want for the base at 4-1/4" x 11". I'd use a heavier weight cardstock so your card holds up better. If you want to stamp or emboss your cardstock, now is the time to do so while it is still flat.

3. Scoring - Starting from one end, score at 1", 2-3/4", 3-3/4", 5-1/2", 7-1/4", 8-1/4" and 10". 


4. Slit - To cut the slit where the tag will pop up from, fold the base in half at the 5-1/2" mark. Cut out a thin section 1/2" up from both edges. The darkened rectangular section in the photo below is what you will cut out. It measures 1/8" x 3-1/4". If you use bulkier embellishments, then you need to cut a wider rectangle so your tag will fit.


When you open the base back up, it will look like this.


5. Adhesion - Put your adhesive on both one inch scored sections on each end of your base. It will be on the side of the paper that you want showing.


6. Attachment - Slide your tag into the slit and line it up to the bottom of your base.


7. Completion - Press the two one inch sections with the adhesive together, so the adhesive sections are facing each other with the bottom of the tag in the middle.


8. Finishing Touches - You can decorate the base of  your card further, including tying a ribbon through the base or adding stickers. Or  just leave it as is, especially if you've stamped the base or used a patterned paper. For your viewing pleasure, here are two other cards I had previously made in this style.


This is the one I've previously made
at my mother's request. 
This is the card that is at Pages of my
friend Debby's new baby. 

Take care,

Wednesday, April 27, 2011

A Little Baby Gift

News Update:

Jillibean Soup's Chilled Strawberry Soup Collection
  • I had my first design team meeting with Pages from the Heart and am very excited at what I'll be doing there. For now I have three projects that I'll be making with Jillibean Soup's Chilled Strawberry Soup line that will be displayed in the store. I finished two of them, but can't show you until it posts on Pages' blog.  They did turn out really cute and one of them features my two nieces, hey girls! I can even develop classes based on my projects to be taught in the store. But I don't know if I can teach adults after teaching 8 year olds for so long. What if I write participants' names on the board for talking to their neighbors and not paying attention in class? Haha. Come on by the store for your scrappy shopping needs and you can see all the DT's submissions which are now displayed.
  • Sketchabilities has its next reveal this Saturday, April 30th. We are also choosing a guest designer for May from the entries received from the April 15th sketch. It could have been you! No, it really could have been. 
My Commissioned Set:
I received a commissioned request from my mom, I wouldn't charge her in case you were wondering. She bought some baby items as a gift and wanted me to wrap it and make it card. Here are the final products:

Baby gift container and stand up card
The Background:
Iced Milk drink with pudding
and honey boba
There is a local tea shop called Half & Half Tea House where the wait is over half an hour for a cup of tea to go, and even longer for a table during prime hours. They have all kinds of flavors and added ingredients, think Starbucks for the Asian crowd. Their signature is the honey boba tea. Kevin and I decided to check it out to see if it was worth the hype. I ordered the iced milk green tea with boba and Kevin had the grapefruit black tea with lychee jelly. Both were excellent and it is worth a trip during the non-crowded times. But at close to $5.00 a cup, we decided to try and replicate the drink at home. We mixed black tea with a bit of grapefruit juice, cut up some lychee jelly and it tasted pretty similar. 

Lychee jelly bites
Now where am I going with this? The lychee jelly came in little bite sized packs, they are actually shaped like hearts but I don't think you can tell in the photo. The packs are contained in a larger tub with a cute little handle. It seemed like there were over 50 packs and it cost less than one cup of tea. We chopped up a bunch of the jellies at once and just added a bit to a cup of iced tea whenever we wanted for a fresh fruity taste. 

When I saw the size of the baby gifts from my mom, I thought they might fit in the lychee jar. I decorated the jar a bit and it was a simple but more unique way to package a gift. Here are some close ups. 


Label with wired baby word

Altered lychee jar with handle
The Card:
The card is pretty cool too. I originally saw free standing pop-up card idea from Imaginisce's blog featuring design team member Rhonda V's totally awesome card. What I liked most is that the card folds down flat but can be opened up to have its own little stand. I like the cards with different shapes and varied dimensions. This one is a little trickier than the side step sushi card, and I had to make some adjustments to get it to freely stand. It is all one connected card, the sentiment part retracts inside the base when you compress it. If you'd like to make one, you can find the directions and measurements here at Split Coast Stampers.


Card popped up on stand

Card folded flat

Until next time,