
I received a request from Pages from the Heart to write up a tutorial about a pop up card I made for them that is currently displayed in the store. I remade the same type of card but changed up the look to give to my brother-in-law at his big 4 uh-oh birthday bash this weekend.
Pop-up Card Tutorial:
This is a great card if you want to give something a little different as a gift to your friends. It mails flat inside a standard A-2 size card envelop but then pops up with its own built in stand. It makes a perfect housing for a photo, gift card or sentiment. The card construction idea came from Splitcoaststampers which you can also access here.
1. Pop up tag - Construct a tag starting with a piece of paper measuring 2-3/4" x 5-1/4". From there you can be creative using more papers or other fun elements from your stash to decorate your tag. Keep in mind the bottom one inch of your tag will be covered so don't decorate that area. Also, try not to use heavy embellishments that will make the card lean back too much and therefore become unbalanced.

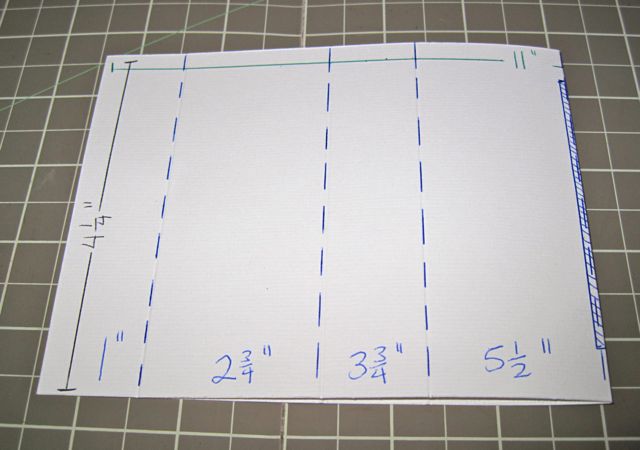
2. Card base - This is the trickier part of the card, so please measure and cut carefully for this section. Cut the paper you want for the base at 4-1/4" x 11". I'd use a heavier weight cardstock so your card holds up better. If you want to stamp or emboss your cardstock, now is the time to do so while it is still flat.
3. Scoring - Starting from one end, score at 1", 2-3/4", 3-3/4", 5-1/2", 7-1/4", 8-1/4" and 10".

4. Slit - To cut the slit where the tag will pop up from, fold the base in half at the 5-1/2" mark. Cut out a thin section 1/2" up from both edges. The darkened rectangular section in the photo below is what you will cut out. It measures 1/8" x 3-1/4". If you use bulkier embellishments, then you need to cut a wider rectangle so your tag will fit.

When you open the base back up, it will look like this.

5. Adhesion - Put your adhesive on both one inch scored sections on each end of your base. It will be on the side of the paper that you want showing.

6. Attachment - Slide your tag into the slit and line it up to the bottom of your base.

7. Completion - Press the two one inch sections with the adhesive together, so the adhesive sections are facing each other with the bottom of the tag in the middle.

8. Finishing Touches - You can decorate the base of your card further, including tying a ribbon through the base or adding stickers. Or just leave it as is, especially if you've stamped the base or used a patterned paper. For your viewing pleasure, here are two other cards I had previously made in this style.
Take care,
Pop-up Card Tutorial:
This is a great card if you want to give something a little different as a gift to your friends. It mails flat inside a standard A-2 size card envelop but then pops up with its own built in stand. It makes a perfect housing for a photo, gift card or sentiment. The card construction idea came from Splitcoaststampers which you can also access here.
 |
| The card can pop up with its own stand. |
 |
| The card can also be folded completely flat. |
1. Pop up tag - Construct a tag starting with a piece of paper measuring 2-3/4" x 5-1/4". From there you can be creative using more papers or other fun elements from your stash to decorate your tag. Keep in mind the bottom one inch of your tag will be covered so don't decorate that area. Also, try not to use heavy embellishments that will make the card lean back too much and therefore become unbalanced.

3. Scoring - Starting from one end, score at 1", 2-3/4", 3-3/4", 5-1/2", 7-1/4", 8-1/4" and 10".


7. Completion - Press the two one inch sections with the adhesive together, so the adhesive sections are facing each other with the bottom of the tag in the middle.

8. Finishing Touches - You can decorate the base of your card further, including tying a ribbon through the base or adding stickers. Or just leave it as is, especially if you've stamped the base or used a patterned paper. For your viewing pleasure, here are two other cards I had previously made in this style.
 |
| This is the one I've previously made at my mother's request. |
 |
| This is the card that is at Pages of my friend Debby's new baby. |
Take care,


1 comments:
wow, this is cool! thanks for the tuto!
Post a Comment