Wednesday, June 27, 2012

Paper Made Bakery: Sunburst Card

The Reveal
As June is winding down, I must say sayonara (さようなら) to this month's Cherry Blossom kit over at Paper Made Bakery. This is my fifth and final project for this month. Please come back on July 2nd for the new kit's reveal and fun blog hop with a giveaway. 

I associate a red and white sunburst with Japanese design, so I wanted to make a sunburst style card. To get tips on how to make the sunburst background or pinwheel flower foreground, please see today's post on PMB's blog

Sunburst Card
Thanks so much for stoppin' by,

Wednesday, June 20, 2012

Paper Made Bakery Reveal: Chinese Paper Lantern with Cut Files

The Reveal
The lantern stamps in this month's PMB kit are so cute, especially on all the cards shown on the blog. I think I had lanterns on my mind and wanted to make my own 3D version. This is about a 3 x 3" size when finished and starts with an 8.5 x 11" piece of vellum.


To see tips on how to make this or the inspiration behind my project, please see today's post on Paper Made Bakery's blog.

The Freebies
If you want to make your own, I created two files for you - a JPEG template for you to print and hand cut, and a downloadable one for your Silhouette to cut.


Version I: lantern hand cut template

Version II: lantern Silhouette cut file download


Thanks so much for stoppin' by,

Friday, June 15, 2012

Pages from the Heart: Simple Stories Mix & Match Album


The Reveal
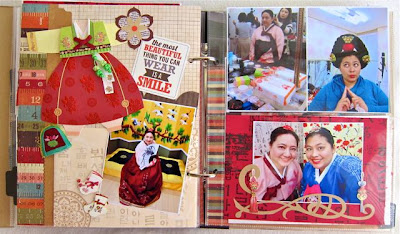
For my last project with Pages from the Heart this month, I used Simple Stories' 6 x 8" Mini-Album to document my recent trip to Korea. I found it to be a cross between Smash Books and Project Life, where I could just tape on my collectibles like postcards and pamphlets while still being able to display numerous photos and journaling cards. 

Simple Stories Mini-Album
The Interior
I ended up making over 20 double page spreads, but I'll only share some of them here. 

For the title page, I used a blank calendar document page and filled it in with the travel itinerary. I decorated it with a metal bookmark and some stickers. For my final page, I made a pocket to hold some pamphlets I acquired during the trip. I decorated the pocket with some patterned papers and part of a Korean card I cut out. 
Title and Final Page
The two main components of the album are the page protectors and document pages. The page protectors come in various designs so you can use 3 x 4", 4 x 4" and 4 x 6" photos. The document pages are 6 x 8" and you can journal on it directly or adhere memorabilia and embellishments. 

I made my own tabs and stapled them onto the document pages to make it easier to find a specific section.
Journal Card and Collage
I printed out a larger photo which I cut to place in two pockets. I also completely cover the document page on the left with a menu I picked up.

I had some receipts I kept so those when on a document page. I downloaded some free Simple Stories journaling cards (right) which matched my color scheme.

I found that one of the best things I did in preparation for the album was to bring a few journaling cards with me on the trip. I filled out one a day which documented what I did and the names of the places I visited. I'm glad I didn't have to try to recall details and spelling of foreign names weeks or months later, in which I would have forgotten most of it.

I find that the things I collect from a trip which I intend to scrap, like the train ticket below (left) and metal bookmark (right), never get scrapped. They make a layout look too busy and ruin the aesthetic, so I end up not using any of the things I brought back, and only use the pictures.

This system reminds me of old school scrapbooking, like when I was a kid. You can just stick anything onto the document pages and not have to worry about layout design, negative space, balance and proportion. 

The purpose is more about documenting your life and less about design principals. I ended up using 100% of all my souvenirs and travel memorabilia, which has never happened before. Also I could document the entire trip unlike the one 12 x 12" summary page I usually do for my regular albums. 


The Supplies
6 x 8” Album: Simple Stories Mix & Match
Album Pages: Simple Stories This & That
Cardstock: Bazzill
Patterned Paper: Echo Park, Simple Stories
Journaling Cards: Simple Stories Free Downloads
Stickers: Echo Park, Sanrio
Alphabet Stickers: Echo Park, Making Memories
Washi Tape: K & Co., assorted
Souvenirs from Korea: bookmarks, gift wrap, cards, stickers, thimble


You can find some Simple Stories free downloads here and here. I also have a Pinterest board of free downloads if you are interested. 


Thanks so much for stoppin' by,

Thursday, June 14, 2012

Pages from the Heart: Zoo Layout

The Reveal
This is my second of three June projects for Pages from the Heart. In today's layout, I went with Kevin to the L.A. Zoo when he was a chaperone for a school club. We took lots of animal photos so I wanted to find a way to showcase multiple photos on a single paged layout.

L.A. Zoo Layout

The Details
I like the look of Instagrams but I don't take pictures on my cell phone very much. I recreated the look on my desktop publishing program, QuarkXpress, but you can use any program that lets you draw squares. 

Simulated Instagrams
The paper in the Note to Self collection has so many fun elements. There is the rating of your day design that I cut out. I paired it with a Tim Holtz game spinner so the arrow really spins and you can adjust the rating depending on your experience. It adds an interactive elements to the page.
Action Spinner
The design that actually caught my eye and pushed me towards purchasing the kit was the page of ViewMaster reels. I cut out three of them and layered it by my title. I added some Glossy Accents on the black squares to give it the look of film. 

ViewMaster Reels
Since I think of the zoo as an earthy place, I thought natural twine was a better fit than elegant ribbon. I used a notebook trim border punch on a strip of brown paper. I wrapped the twin around each punched hole for a decorative effect. I also tied a bow around one letter in my title to bring twine to another part of the layout. 
Twine Column

The Collection
For all the patterned papers, I used Echo Park's Note to Self collection kit. This is my new go to kit because it can be used for any occasion as the theme is documenting life. 


Supplies:
Cardstock: Bazzill
Patterned Papers: Echo Park Note to Self Collection
Alphabet Stickers: Echo Park, American Crafts
Ink: Clearsnap
Washi: K & Co., assorted
Game Spinner and Brad Set: Tim Holtz
Clear Medium: Inkssential
Pen: Pentel
Twine: May Arts
Border Punch: EK Success

To see this and all the other design team projects, please visit Pages from the Heart in Monrovia, CA or online.
Thanks so much for stoppin' by,

Wednesday, June 13, 2012

Paper Made Bakery: Dryer Sheet Money Holders

I was reading a section Tipnut's blog entitled, "20+ Crafts to Make from Recycled Items". The one item that caught my eye was dryer sheet envelopes which sounded so awesome if it really worked. I tried it, made some minor variations and I totally love the results!

Dryer Sheet Money Holders

It takes regular smooth paper and transforms it into textured, handmade looking expensive Japanese washi paper. If you would like to learn more and create your own money wallet, please hop on over to today's post on Paper Made Bakery where I show you the process. It really is quite quick and painless to make. It looks and smells great in person too.

Thanks so much for stoppin' by,

Tuesday, June 12, 2012

Pages from the Heart: Father's Day Card

The Collection
I was at Pages from the Heart and saw one of their new collections, Note to Self by Echo Park, and just totally loved it. What I liked best was that the designs seemed very versatile and open ended so it can be used for any occasion.

Note to Self Collection
The Reveal
Since the collection's theme and colors are kind of neutral, it can easily be adapted for more masculine projects. With Father's Day coming up, I wanted to make a Father's Day card. I see a lot of shirt and tie cards, but was imagining more of a row of ties. I searched for an origami tie fold and found this diagram. I folded four ties using 3 x 3" squares of patterned papers.
Father's Day Card

I wanted the ties to be hanging on something, instead of just floating on the card, so I thought to use a skewer from the kitchen to simulate a wooden closet rod. 


I tied in the bold patterns in the paper with a few strips of washi tape in the corner. I wrote a sentiment on a raffle ticket which I cut from the patterned paper. If you'd like to see this in person along with many other design team projects, please stop by Pages from the Heart

The Vote
I'm also entering this in CutCardStock's masculine card challenge. If you like my card, please go to CutCardStock's blog and vote for my card by clicking on the "Like" button. 

Thanks so much for stoppin' by,


Monday, June 11, 2012

Engagement Album Part II

Engagement Album Part II
These are the last 11 pages in a 20 page engagement album I made for my cousin, Mina. If you would like to see the first 9 pages, please go here for part I. 

The wedding colors were Tiffany blue and salmon, so she wanted the album to utilize those colors. Luckily I found a plain album in that shade of blue. I decorated the cover a bit with ribbon, flowers, a pearl brad and chipboard letters of their first initial. 

The album has two sections, with photos from a professional photographer and candid ones from their dates. 

The Professional Photos
Mina and her fiancé, John, took some gorgeous engagement photos using a professional photographer, Anna May Lam. These photos were easy to scrap as they were from the same day and I could easily group the photos from the same setting together so they have the same color scheme. 

This is the final page in the album. I wanted to tie it in with the first page of the album so there would be closure, even though they wouldn't be displayed side by side. I used a similar layout and just changed the orientation to accommodate the picture's orientation. I used the same strips of ribbon in the background instead of patterned paper for a softer effect. 


Here are the title and final pages together, although they aren't displayed side by side in the album. 


These are two pages I grouped together to make a double paged layout. I thought the background were similar enough to be combined onto one layout.

 I brought a smaller photo from the first page's setting onto the second page to help tie it together. I used a circle punch to punch out the circular photo and adhered that onto a large paper clip. I then put Glossy Accent over the top to give it an epoxy look.


For most of the album I used a cream colored cardstock for the background to balance out all the bold blues and oranges, and the busy patterns in the papers. For this next layout, I used Kraft cardstock because the patterned papers already had a cream base and I wanted some contrast. I was wary to use the Kraft since I didn't think it would be formal enough, but it actually turned out to be my favorite layout from the professional photo section. 


I used Sketch Support sketches, Bazzill cardstock, Authentique patterned papers, May Arts and Prima ribbon and Prima flowers. I bought some alterable paper clips from Pick Your Plum. I used the small ones on this layout so Mina and John each had their own paper clips in this one. 


The Candid Photos
My cousin also emailed me an assortment of candid photos. These were much more difficult to scrap as they were from various occasions and the colors and backgrounds were totally different from each other. Also I didn't know where they were or what was the story behind some of the photos. So this is what I learned from the process. 

Tips to Scrapping a Random Assortment of Photos:
  • Find a way to group them. After looking at the different batches of emails, I created my own themes which I hope was okay with my cousin. I grouped them by occasion (the actual engagement day, vacation photos) and cartoony photos. 
  • Put like colors together. After grouping together the vacation photos, I placed all the ones with a blue sky or blue water background on one page, and the others with a more pink or orange tint on the other page. Then at least within one layout each page looked more cohesive even though they were of various events. 
  • If the colors don't match, colorize the photos yourself. The cartoon page just had too much going on with colorful photos, dark night time ones, a studio shot...so I used an antique filter and toned down the colorful ones and boosted the colors on the dark ones so the set looked more cohesive. 
The Engagement Layout
Since they got engaged at Disneyland, I used my Disney font cartridge to create the layout. I cut out the letters onto a ticket shape and used the negative space matted on another piece of paper to create the title. 


I cut a large Micky head in silhouette and solid mode to create the background. I also cut a series of tiny Micky heads to made a border strip. 


The Travel Layout
These are the travel photos where I grouped like colored backgrounds together on one page. I didn't know what she wanted for the title or journaling and I didn't want to bother her since I figured she had enough to worry about the week before the wedding, so I eliminated the journaling and made up my own title.


I created a large cluster of flowers on each page that looked like they were in a strip to connect the two pages. 

The Cartoon Layout
I thought a lot of their pictures were really cute, where they kind of looked like comic book characters so that became a page. Since there were 7 separate occasions on this double page spread, I colorized the photos so they would look more balanced. The comic cups were on one page. 

Their cartoon drawings were the focal point of the second page, with their real life photos in supporting roles. 


I did feel overwhelmed by my assignment at first, but I managed to finish all 20 pages in three weeks, just in time for the wedding. So if you have a big pile of photos or a giant file on your computer, just group a couple photos together, print them out, work on a section at a time and you can conquer that pile in no time. It is totally possible to accomplish. 

Thanks so much for stoppin' by,

Friday, June 8, 2012

My Cousin's Wedding

The Wedding
Last Saturday I attended my cousin's beautiful wedding at a mansion in San Juan Capistrano. 
John and Mina's Wedding
The Scrappy Details
Everything was perfect and they had their own special touches, like having Yogurtland cater their dessert, which was the site of one of their first dates. Being scrapbooker, I noticed all the crafty details.

Since the ceremony was outside during the day, guests received paper umbrellas as sunshade. 

I loved the painted sky in the foyer of the mansion, as shown here with the bride and bridesmaids. 

The flower arrangements were gorgeous, I especially loved the roses emersed in water within the vase.


There were cake pops of the bridal party on a decorative cake. The cake pops were edible but not the central cake.

The cake was located on the reception table where guests signed in and looked at wedding photos of both sets of parents. 

I hope the cake pops were for public consumption as my nephew ate two of them.

Besides the decorative cake, there was the real cake with their caricatures on top. 

Their caricatures were on the invitations, program and the complimentary photos take at the photo station. 

The wedding colors were Tiffany blue and orange as seen here in the overhead garland of paper lanterns which hung over the patio where the reception was held.

The place cards for the banquet were hung on a paper lantern arch. 

I made an album of the engagement photos for guests to view at the sign in table. I had planned to share  photos of the layouts in today's posts, but it is already too photo laden. Another day, then. 

Congratulations to the newlyweds! I know you diligently planned the wedding and it all turned out perfectly. 

 Thanks so much for stoppin' by,