Showing posts with label Mini-Album. Show all posts

Thursday, June 20, 2013

"Isaiah Goes Swimming" Mini Album Book

The Project
I made my nephew a mini-album/easy reader book. 


The Inspiration
When I was babysitting him, he had to practice his reading using a series of leveled reading books. These were "Hi-Lo" books, high interest-low readability, using a lot of site words and repeated patterns. But judging by the way he was squirming around and needing a lot of "redirection", I was thinking it was more like "Lo-Hi" books, low interest-high readability. 

I had just taken some photos of him using an underwater case on my camera and decided to make him a book in the same genre. 

The Details
I started by rummaging through my existing mini-albums and found this Maya Road 3 ring binder chipboard album. It was the perfect size at 4.5 x 7" and contained 6 sturdy pages inside. 

I used my desktop publishing program, QuarkXPress, and created a basic template for a page. It contained a photo box and text box which was the size of the chipboard page. Four pages fit on a sheet of 8.5 x 11" photo paper. In total, I created 12 pages using 3 sheets of photo paper. 


I cut out each page and adhered it to the chipboard pages. I decorated the cover using a minimum of 2-D elements for durability. It feels very sturdy, like the board books for babies. 

The Inside
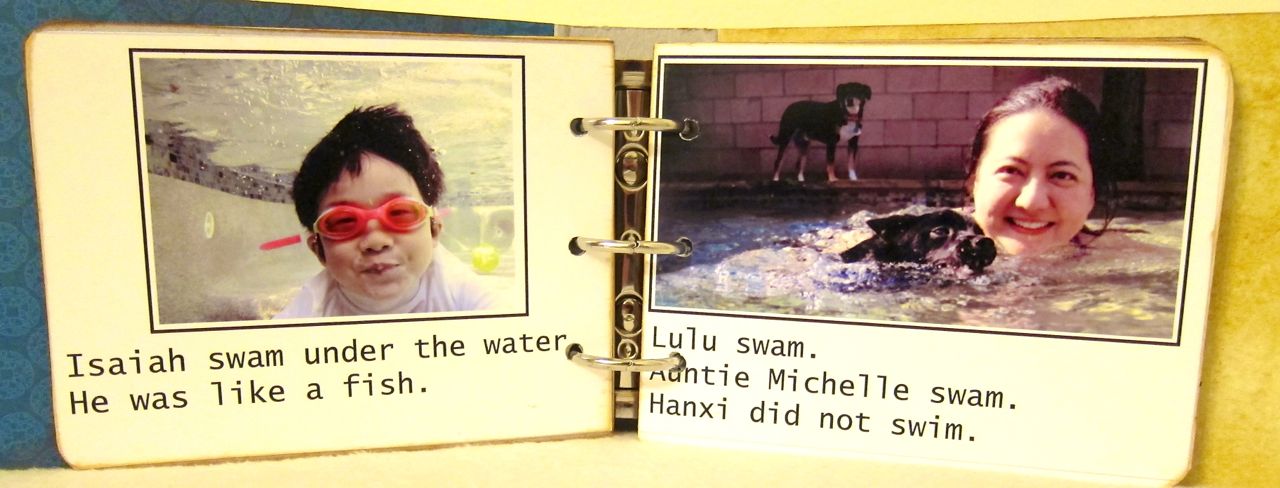
Here is a look at the inside pages. 


Hope you enjoyed my scrapping meets education project.


Thanks for stoppin' by,

Monday, May 20, 2013

Love to Scrap! Flip Flop Mini Album

The Challenge
Today is the start of Love to Scrap's Challenge #6: Color My World! The theme is to use either all primary or all pastel colors on any type of project. I chose to use bright neon colors. My original thinking was I wanted to choose the opposite of pastel and neon came to mind. The bright colors went well with a fun in the sun mini-album.


The Details
I was browsing my local thrift store when I saw a set of four foam flip flop coasters for $1.00. They looked like tiny flip flops with the heels cut off. In fact, several people asked me what I was holding. I said coasters that will become mini-albums, but I don't think I cleared up their confusion. This is the intended use for them.


I took two of the flip flops and decorated them for the front and back covers. We are also supposed to use stamps for this challenge so I made some stamped embellishments - a popsicle, banner, arrows and a frame. I also stamped, "love this" directly on the straps of each flip flop. 


I traced the flip flops onto some cream cardstock and cut it out to make the interior pages. I added strips of paper to make a background design and adhered the photos on top. I used a Crop-A-Dile to add an eyelet to each page including the covers. 


All the pages are double sided and I tied it together with a ribbon. 


Here is a glimpse of the inside. I gave it to my nephew and he really liked it. 


The challenge runs until June 2 and the winner will receive a $10 certificate from Fred, She Said Digital Design. Please join us and link up your creation or just drop by Love to Scrap! to see all the other projects from the design team.

I'm entering this in:
Make it Monday - #141 Anything Goes
Creative Creations Challenges - #10 For a Child
Love to Create Challenge Blog - #66 Something for Kids
613 Avenue Create - #20 Anything Goes

Thanks so much for stoppin' by,

Monday, March 25, 2013

Pages from the Heart: Detour Collection

For Pages from the Heart, I made a series of projects using Bo Bunny's Detour collection, which is a travel themed line. 


The first project I completed was a layout of my new puppy which I've already blogged about  here. I also made an altered item and a mini-album. 

Rockstar Altered Item
Even though this is a travel collection, I wanted to make something non-travel related. I paired it with a can of Rockstar Energy Drink since the colors of the can matched perfectly with the colors of the Detour collection.


I used a cloth wrapped floral stem, which can be found in the floral section of a craft store, as the starting off point. I attached a sign which reads, "I think you're a ..." which is completed by the name of the drink. To continue the rockstar theme, I made some star shaped flowers and attached it to the sign. The floral stem is a green color and didn't match, so to tone it down, I wrapped some black washi tape around the stem. 


I adhered the stem to a belly band that I wrapped around the drink. This would make a fun gift to give to a guy, especially on Valentine's Day. 

New Orleans Mini Album
For my last project, I made a travel mini-album. The cover is a piece of plain chipboard that I folded and added patterned papers and embellishments onto. I hole punched it and used two book rings to secure the inside pages. I tied some Mardi Gras beads to the rings and added the baby Jesus that Kevin found in his King cake to the cover. 


This is a view of the back cover. 


The best part of the album is that the inside pages are made from the 6 x 6" sheets. Just make a 2" fold along one edge, take two folded pieces and stitch on three sides. This will give you a pocket along the 2" fold to store tags, photos and memorabilia. 


The bonus is that there is an extra space between the pages (back to back). That is where I placed my journaling with little pull tabs. For more info. about the construction, please see this post from Practical Scrapper's blog. 

Here is a view of all the pages inside. 


This is a great way to use up those 6 x 6" pads. If you don't have that, then just cut up a 12 x 12" paper and you'll have four pages to work with. I ended up placing all the memorabilia I brought back from my trip (brochures, photos, business cards, bookmarks, pins) inside the album. Otherwise, it would just be gathering dust in a forgotten drawer. 

All the projects are on display at Pages from the Heart, so you can see it in person when you come on by!

Monday, October 1, 2012

Sweet Stamp Shop: 3 Uses for 1 Stamp

Hello friends, today I have three projects up on Sweet Stamp Shop's blog. I chose one stamp and used it in three different capacities - on a card, layout and altered item. I wanted to show the versatility of using just one stamp. Here is a sneak peek at one of my projects.


I used the stamp set entitled Lil' Sweet Peps and focused on the camera stamp. 


To see all three projects, please stop by today's post on Sweet Stamp Shop's blog. There are also many great projects from the entire design team throughout the month. Sweet Stamp Shop's October release and blog hop and giveaway will occur the week of October 22, so please remember to join us then.

Thanks for stoppin' by,

Saturday, July 14, 2012

Florida Vacation Mini-Album

 Masculine Card Challenge Update
I made this tie rack card last month for Father's Day and entered it in CutCardStock's masculine card challenge. If you want to make one yourself or see the link to the origami fold, please go here. I ended up winning the viewer's choice award, so I wanted to say thank you to everyone who voted for me.
Tie Rack Card
As an added bonus, CutCardStock asked me to be a guest designer for them this month. I made two projects using their cardstock and invitation sets which will be shown on their blog today and next Saturday.

The Supply Base
For being a guest designer, CutCardStock set me a Priority Mail Box filled to the brim with their products. I was so surprised by their generosity and loved the versatility of their products. My favorite item was the brown bag A7 (5 x 7") folded invitation set. It really does feel like a brown paper bag, being softer than Kraft cardstock and that cut out on the flap is super cute. I decided to create a project featuring the brown bag set. 
Brown Bag Card & Envelope
This month from Pages from the Heart, I worked with two new Echo Park collections - This & That (Charming version, which is boy themed one) and Enjoy the Ride (which is a mini-theme featuring travel).
Echo Park Collections
I paired the solid paper bags with fun images from the patterned papers to create an interactive vacation mini-album. 

The Reveal
I bought a small three ring binder from Big Lots for $2.00 for my album's exterior. I decorated it with the Echo Park papers and stickers, along with some photos and Glossy Accents. 

Orlando Vacation Album

For the inside cover, I covered it with light blue airplane paper and adhered my itinerary for the week. Each page inside the album consists of an envelope. I have 7 pages total, one for each attraction I visited plus a bonus envelope to house unused items like extra postcards. 

Inside Cover and First Page

Inside each envelope is the matching folded card, which can be taken out and opened up. This allows for six surfaces to be decorated - the front and back of the envelope, the front and back of the card, and the interior double panel of the card. This is a lot of room to work with, so I actually used everything I brought back from my trip - photos, brochures, pressed pennies, souvenirs and other memorabilia. 

Envelope Opens with Pull Out Card
The Interior
I'll show you one complete page in my album. This one features a trip to Gatorland. Here is the front of the envelope with has a group photo, description of the park cut out from the brochure, a pressed penny, admittance wristband and real alligator teeth I adhered to the alligator photo. 


Front of Envelope

Real Gator Teeth
The flap opens and you can pull out the card. I brought some 3 x 4" journaling cards with me on the trip which I filled out each day. I cut them in half and adhered them to the inside flap on each envelope. This way, I didn't have to try to remember the details weeks or months later, especially when I'm in the middle of designing a page.

Inside of envelope and card front

The card opens up and I can place the larger items inside. Here I cut out the map of the park, attached a photo with an arrow pointing to the location where the photo was taken.
Inside of Card

The back of the envelope is the perfect size for a 5 x 7" photo, and the back of the card can hold a collage of mini-photos. I used 10 photos, a map, journaling card, brochure, souvenirs, plus my regular embellishments on one "page" of my album. Anything else leftover from my Gatorland visit, I just tossed as I'm never going to use them again.


To see the rest of the pages, they are spread out on CutCardStock's blog and Pages from the Heart's blog

This gave me a good feeling of utilizing everything I brought back and a sense of completion regarding scrapping my trip. It was a lot faster than scrapping a 12 x 12" album and turned out to be a fun and interactive album that people might enjoy browsing through. 

You can use any card envelope you have lying around, an empty small binder and a piece of cardstock cut to fit inside your envelope. If you want to use the brown paper bag set that I used, you can purchase the envelope here and the card here. I actually liked them so much, I later purchased the A2 and square set. If you want to see the album in person, please visit Pages from the Heart

Thanks so much for stoppin' by, 

Friday, June 15, 2012

Pages from the Heart: Simple Stories Mix & Match Album


The Reveal
For my last project with Pages from the Heart this month, I used Simple Stories' 6 x 8" Mini-Album to document my recent trip to Korea. I found it to be a cross between Smash Books and Project Life, where I could just tape on my collectibles like postcards and pamphlets while still being able to display numerous photos and journaling cards. 

Simple Stories Mini-Album
The Interior
I ended up making over 20 double page spreads, but I'll only share some of them here. 

For the title page, I used a blank calendar document page and filled it in with the travel itinerary. I decorated it with a metal bookmark and some stickers. For my final page, I made a pocket to hold some pamphlets I acquired during the trip. I decorated the pocket with some patterned papers and part of a Korean card I cut out. 
Title and Final Page
The two main components of the album are the page protectors and document pages. The page protectors come in various designs so you can use 3 x 4", 4 x 4" and 4 x 6" photos. The document pages are 6 x 8" and you can journal on it directly or adhere memorabilia and embellishments. 

I made my own tabs and stapled them onto the document pages to make it easier to find a specific section.
Journal Card and Collage
I printed out a larger photo which I cut to place in two pockets. I also completely cover the document page on the left with a menu I picked up.

I had some receipts I kept so those when on a document page. I downloaded some free Simple Stories journaling cards (right) which matched my color scheme.

I found that one of the best things I did in preparation for the album was to bring a few journaling cards with me on the trip. I filled out one a day which documented what I did and the names of the places I visited. I'm glad I didn't have to try to recall details and spelling of foreign names weeks or months later, in which I would have forgotten most of it.

I find that the things I collect from a trip which I intend to scrap, like the train ticket below (left) and metal bookmark (right), never get scrapped. They make a layout look too busy and ruin the aesthetic, so I end up not using any of the things I brought back, and only use the pictures.

This system reminds me of old school scrapbooking, like when I was a kid. You can just stick anything onto the document pages and not have to worry about layout design, negative space, balance and proportion. 

The purpose is more about documenting your life and less about design principals. I ended up using 100% of all my souvenirs and travel memorabilia, which has never happened before. Also I could document the entire trip unlike the one 12 x 12" summary page I usually do for my regular albums. 


The Supplies
6 x 8” Album: Simple Stories Mix & Match
Album Pages: Simple Stories This & That
Cardstock: Bazzill
Patterned Paper: Echo Park, Simple Stories
Journaling Cards: Simple Stories Free Downloads
Stickers: Echo Park, Sanrio
Alphabet Stickers: Echo Park, Making Memories
Washi Tape: K & Co., assorted
Souvenirs from Korea: bookmarks, gift wrap, cards, stickers, thimble


You can find some Simple Stories free downloads here and here. I also have a Pinterest board of free downloads if you are interested. 


Thanks so much for stoppin' by,