Showing posts with label Boy. Show all posts

Thursday, October 17, 2013

Paper House: Origami Cards

The Projects
I wanted to make a boy and girl version of a similarly designed card to show the versatility of the different Paper House collections. I thought origami would add a fun touch and the weight of Paper House’s papers are just perfect for folding.  


Boy Scout Card
To fold the shirts, I followed the pictures from Origami Resource Center. I cut three rectangles at 3” x 4.5” from different sections of the My Lil’ Scout papers to get different colors.


I tied ribbon around the collars to look like neckerchiefs. I finished it with some black acrylic paint from a squeeze bottle to make the buttons. I used some 3-D stickers for the sentiment and embellishments.


You can also use a dollar bill, or any paper money, and fold it into a shirt. That would be a fun way to give money instead of using a money holder.

Supplies
Cardstock
Paper Clip 
Ribbon
Twine
Acrylic Paint

Birthday Girl Card
For the birthday girl card, I wanted some brightly colored dresses as the focal point. I gave three dresses to my niece for her birthday, so I thought some origami dresses would be perfect on the card.


The Gymnastic paper has some rainbow stripes on it which will yield a variety of dress colors. I cut some 3” x 3” squares from one strip across the page. Each square makes a different colored dress so you can mix and match.


I followed the instructions from Inklings & Yarns’ blog to fold the dresses. This is a written tutorial, there are also many video ones if that is your preference. I like referring to diagrams when I'm folding. For a final touch, I added some floral nail decals on each dress. These come a variety of designs and colors and can be found at beauty supply stores. They look like fimo clay. I find that the beauty supply stores are kind of pricy so I actually bought this at a discount clothes store in the accessories section.


Supplies
Cardstock
Paper Clip 
Nail Decal
Twine

 Tips
• Practice first on some scratch paper before using the patterned papers. I did that and it saved me from wasting some patterned papers.
• The shirt is easier to fold than the dress. I'd start with the shirt first.
• Use a bone folder to give you sharp creases. This really gives you crisp folds and makes it less bulky.
• The mini clothes hanger is made from a regular size paper clip. Start by bending it slightly apart. Wrap the shorter end around the longer end and crimp it closed. Then curl the top of the hanger into a hook shape. Cut off the excess wire.


• You can easily change the look of the clothing for different occasions. For example, make the dresses in white for a wedding card or add a tie to the shirt for Father’s Day.

If you would like an instruction sheet, here is a downloadable PDF. This project is also up on Paper House's blog today


I'm entering this in the following challenges:
4 Crafty Chicks: #164 Multiple Layers
4 Krafty Girlz: Anything Goes
Crafty Ribbons Challenge: #66 Anything with Ribbons
The Crafter's Cafe: #33 How Adorable
Crafting with Dragonflies: #13 Nature, Trees, Leaves

Thanks so much for stoppin' by,

Wednesday, September 25, 2013

Paper House: Superhero Wall Hanging

The Project
I'm really excited to share with you my first project as a designer with Paper House Productions! I made a framed wall hanging for my nephew, documenting his latest interest - reenacting the exploits of the Teenage Mutant Ninja Turtles.


The Collection
When I looked through Paper House's extensive collection of scrapbooking sets, the one that really jumped out at me was the Birthday Boy collection


Even thought it was birthday themed, I really like the super hero aspect of it, which really matched my photos. 

The Details
I took two stickers, "birthday boy" and "birthday Hero," cut out the birthday portion, and reassembled them together to form my title, "boy Hero." Around the title, I added a few more stickers like the blue 3-D mask which matched my photo perfectly. I then added some goggly eyes on top of the sticker and some sequins and wood veneer stars for some finishing touches. 


For my layout design, I used the following sketch that I created. 


Since this was a gift, I framed my layout which turned it into a wall hanging. A layout tells more of a story and is more dynamic than giving just a framed photo. If you would like an instruction sheet with the sketch, here is a downloadable PFD.


Supplies:
Paper House Products:
Birthday Boy Collection (SBC-0161)
Happy Birthday Boy paper (P-0666E0
Super Hero City paper (P-0667E)
Birthday Boy 3D Stickers (STMD-0173E)
Birthday Boy Cardstock Stickers (STCX-0180E)
Other:
Frame for 8 x 10” photo
Sequins
Goggly Eyes
Wood Veneer Stars
Markers
Glitter Glue

I'm entering this in the following challenges:
Rhedd and Rosie Challenge Blog: #16 Something for Men
Shopping Our Stash: #120 Kids

Thanks so much for flyin' by,

Wednesday, September 18, 2013

Sweet Stamps: Paper Piecing and Western Challenge

I have two cards to share with you today as a guest designer for Sweet Stamps.

Paper Piecing Card
The current monthly technique challenge at Sweet Stamps is on Paper Piecing. Here is my contribution:


I started by stamping this bee on two separate sheets of patterned papers. I cut out the eyes and wings from the pale blue sheet and popped it on top of the yellow sheet.


I wanted a school theme so I placed the bee in front of a slate board and paper pieced some chalk and a chalk holder. I had the bee write the sentiment, which is actually this stamp


I'm entering this card in the following challenges:
365 Cards: Day 259 - In a Bubble
Lady Anne's Challenges: #11 Anything Goes

Western Card
The current weekly challenge theme at Sweet Stamps is Western. I made a shaker card for my nephew since he likes to dress up like a cowboy when he goes to Knott's Berry Farm. 


I made a scalloped frame around the photo using some punched circles of a horse silhouette stamp. Here is the card when it is shaken. 


I used a quick and easy washi tape technique to make the shaker element. 


If you would like further details on either card, please see this post. If you would like to enter the paper piecing challenge, please go here. If you would like to enter the Western challenge, please go here

I'm entering this in the following challenges:
Divas by Design: Anything Goes
Inklings & Yarn: Inky Linky Party 30
Clear it Out Challenge Blog: Theme - Boys, Stash - Circle Punch

Thanks so much for moseying on by,

Thursday, June 20, 2013

"Isaiah Goes Swimming" Mini Album Book

The Project
I made my nephew a mini-album/easy reader book. 


The Inspiration
When I was babysitting him, he had to practice his reading using a series of leveled reading books. These were "Hi-Lo" books, high interest-low readability, using a lot of site words and repeated patterns. But judging by the way he was squirming around and needing a lot of "redirection", I was thinking it was more like "Lo-Hi" books, low interest-high readability. 

I had just taken some photos of him using an underwater case on my camera and decided to make him a book in the same genre. 

The Details
I started by rummaging through my existing mini-albums and found this Maya Road 3 ring binder chipboard album. It was the perfect size at 4.5 x 7" and contained 6 sturdy pages inside. 

I used my desktop publishing program, QuarkXPress, and created a basic template for a page. It contained a photo box and text box which was the size of the chipboard page. Four pages fit on a sheet of 8.5 x 11" photo paper. In total, I created 12 pages using 3 sheets of photo paper. 


I cut out each page and adhered it to the chipboard pages. I decorated the cover using a minimum of 2-D elements for durability. It feels very sturdy, like the board books for babies. 

The Inside
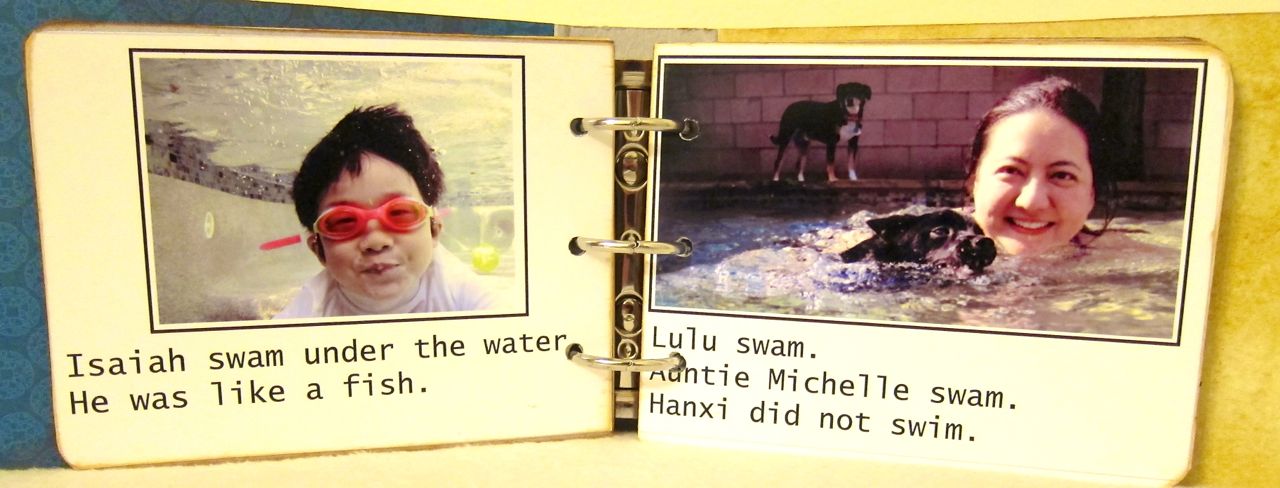
Here is a look at the inside pages. 


Hope you enjoyed my scrapping meets education project.


Thanks for stoppin' by,

Monday, June 17, 2013

Love to Scrap! Easter in Bloom Layout

The Challenge
Welcome to the latest challenge for Love to Scrap! entitled "No Cards Allowed!" Any type of project can be entered, except for cards. I made a layout about going to Knott's Berry Farm with my nephew during Easter week. They had some special events during Knott's Berry Bloom.


The Sketch
I saw this Becky Fleck sketch on Pebbles Inc.'s blog last October and I stored it in the back of my mind, just waiting for the perfect opportunity to use it. It was a great fit with my photos and paper collection, so I was glad to finally be able to use such a cute sketch.


The Details
I chose American Crafts' Dear Lizzy's 5th & Frolic collection because of its beautiful spring colors. I cut out some Polaroid shapes from a piece of patterned paper in the collection and arranged those as the background grid to replicate the squares. The centers of the Polaroids were white so I filled some with different patterned papers or mini photos. I also left some as is. 


I mostly followed the sketch except I moved the main photos from the right to the left side of the page to better accommodate my journaling block. The little boy and girl graphics on my journaling block would have covered too much of the photo. 


Our sponsor for this challenge is Bugaboo Digi Stamps, who I just love. They gave all the DT members a different image to work with. I chose AKV sign it since it was so versatile and looked perfect for a journaling block. I actually imported the stamp into Silhouette Studio Designer and made a print and cut file. I printed it on my printer, then the Cameo cut it out for me so I wouldn't have to fussy cut around stick people with all those thin appendages. This technique is a great time saver, especially if you have to print and cut multiples of the same image. I then colored the image with Copics. 


Lastly I used some American Crafts foam alphabet stickers for my title. The foam alpha are pliable and much easier to maneuver than chipboard alphas. Also the adhesive is better so they don't fall off like the chipboard letters. I was at a crop and my friend Becky donated these letters to me since I only had black alphas with me. 


The challenge runs until June 23 and the winner will receive 7 digital stamps from Bugaboo Digi Stamps. Please join us and link up your creation or just drop by Love to Scrap! to see all the other projects from the design team.

I'm entering this in:
The Crafty Bloggers Network - Challenge #12: Bright and Breezy
Make it Monday - #145 Anything Goes
Eureka Stamps - #44 Anything Goes
Mema's Crafts - June Anything Goes


Thanks so much for flutterin' by,

Monday, May 20, 2013

Love to Scrap! Flip Flop Mini Album

The Challenge
Today is the start of Love to Scrap's Challenge #6: Color My World! The theme is to use either all primary or all pastel colors on any type of project. I chose to use bright neon colors. My original thinking was I wanted to choose the opposite of pastel and neon came to mind. The bright colors went well with a fun in the sun mini-album.


The Details
I was browsing my local thrift store when I saw a set of four foam flip flop coasters for $1.00. They looked like tiny flip flops with the heels cut off. In fact, several people asked me what I was holding. I said coasters that will become mini-albums, but I don't think I cleared up their confusion. This is the intended use for them.


I took two of the flip flops and decorated them for the front and back covers. We are also supposed to use stamps for this challenge so I made some stamped embellishments - a popsicle, banner, arrows and a frame. I also stamped, "love this" directly on the straps of each flip flop. 


I traced the flip flops onto some cream cardstock and cut it out to make the interior pages. I added strips of paper to make a background design and adhered the photos on top. I used a Crop-A-Dile to add an eyelet to each page including the covers. 


All the pages are double sided and I tied it together with a ribbon. 


Here is a glimpse of the inside. I gave it to my nephew and he really liked it. 


The challenge runs until June 2 and the winner will receive a $10 certificate from Fred, She Said Digital Design. Please join us and link up your creation or just drop by Love to Scrap! to see all the other projects from the design team.

I'm entering this in:
Make it Monday - #141 Anything Goes
Creative Creations Challenges - #10 For a Child
Love to Create Challenge Blog - #66 Something for Kids
613 Avenue Create - #20 Anything Goes

Thanks so much for stoppin' by,

Monday, March 4, 2013

Love to Scrap: Challenge #1: Anything Goes!

The Challenge
The very first challenge on Love to Scrap's blog is entitled, "Anything Goes," so basically you can make any type of project. The design team members were given digital stamped images by Bugaboo Digi Stamps to work with. The winner will receive 7 digital stamps from Bugaboo as a prize, and the images are super cute! 


The Reveal
I made this birthday card for my nephew who will be turning 6 next month.


The Details
I chose to work with the Deacon Piper digital stamp because it reminded me of my nephew who was Peter Pan last Halloween. His sister was Tinkerbell, and my hubby was pretending to throw candy at them when they came trick-or-treating at our house.


I colored the image with Copic markers.


I made some notes using gems and a brown liner marker, stamped "Happy Birthday To You!" so it would look like the piper was playing the birthday song.


I used two pieces of BoBunny patterned papers (background) that I had lying around on my desk which I had just received from attending a crop. I matched it with a piece of scratch Scenic Route paper (banners) from my scrap pile. I love how everything from different places came together.

Supplies
Cardstock: Bazzill
Patterned Papers: Bo Bunny, Scenic Route
Digital Stamp: Bugaboo Digi Stamps
Sentiment Stamp: My Sentiments Exactly!
Ink: Prima Marketing, Stampin’ Up
Border Punch: EK Success
Gems: Doodlebug Designs
Markers: Copic

For more details about the challenge and to see the rest of the design team's projects, please see today's post on Love to Scrap. For general challenge guidelines, please go here. This challenge is open for two weeks, so get your entries in before Sunday, March 17th at 5 P.M. Pacific time. You must have something lying around begging to be seen!

I'm entering this in:
ABC Challenges - Anything Goes.
Created with Love Challenges - Anything Goes
Party Time Tuesdays - Anything Goes
Divas by Designs - Anything Goes
Catch the Bug - Anything Goes
My Grafico - Anything Goes
Paper Playtime - Anything Goes
Pause Dream Enjoy Challenges - For the Boys
Victorine Stamps - Anyting Goes
Challenges 4 Everybody - Anything Goes

Thanks so much for stoppin' by,

Thursday, February 7, 2013

Look What I Can Do! Scrapping with a 5 Year Old


His Interests
My 5 year old nephew had the flu so I babysat him for a week until his fever rescinded. So amidst the sword fighting, Transformers, paper airplanes, naps and reading of books with 3 letter short vowel sounds, I snuck in some scrapbooking and card making for him.

Re-enacting the final battle between Anakin and Obi-Wan on rocks in lava, dressing up as a knight king
My Interests

I remember reading a blog post on Sketch Support, which has since closed, where the designers used sketches and had their kids make layouts or cards. I thought I'd try the same technique with him. I had him look through an Allison Davis sketch book, and he picked out this 5 photo sketch. 


He chose 5 photos from one of my digital files and I printed them out in the various sizes. He chose his background and matting papers. Here he is positioning his photos. 


He used a tape runner for the first time and was wondering why the glue wasn't wet. The only thing I did was trim the two blue rectangles for him. 


He chose his own embellishments and adhered everything onto the background page himself. We used Best Creation's Loops and Scoops collection. I had won that collection but never used it and it was a perfect all inclusive pack which matched the amusement park theme of the photos.

He wrote, "I had a fun day" on the journaling tag and I added the location and date.


That was Isaiah's first layout and it took about an hour including choosing and printing the photos. After we showed his mom, she wanted him to make a Valentine's Day card for his kindergarten teacher. 

The next day, we worked on a card using Sketches for Cardmaking. Here is the sketch with the completed card. We used Basic Grey's Blush collection. I gave him an assortment of A2 sized cardstock and he chose the pink. He looked through the Blush 6 x 6 pack and chose the flower patterned paper. I asked what complementary cardstock did he want for the vertical strip and he said brown. I asked what color ribbon and he said white. Lastly I had a kit of Valentine embellishments and he picked out the finishing decorations. He had no problem choosing what he wanted. 


Here he is adding on the embellishments while dressed as a king that day. We also added a lollipop on the envelope for a finishing touch, as that is his favorite candy. 


After we showed his mom the Valentine, she hinted that she wanted one also. So the next day, Isaiah picked out this card sketch. 


He said his mom's favorite color was blue so he picked the blue cardstock background. For the patterned papers we used My Mind's Eye six by six Happy Day collection. He chose the hexagons which I told him were very trendy.  I asked him if he knew what hexagons were. He said no, only octagons. 


He used a T Square ruler to draw the line on which he adhered all the buttons. He also used a paper trimmer for the first time to cut the patterned papers. He liked choosing the buttons from my stash. He also wanted to add one extra pink one as the focal point.


The inside sentiment reads, "You are the best Mom in the world Isaiah."


The cards were a lot quicker, about 20 minutes each. If you pick out a collection or kit for the materials, then it isn't too overwhelming for the child. If you use a sketch, then they have a starting off point and can deviate from there. It was pretty fun and now he understands a bit more of what I do. 

Thanks so much for stoppin' by,