Thursday, September 27, 2012

Paper Made Bakery: September Summary

Hello  scrappy friends, today I have a summary of all 5 projects I made this month for Paper Made Bakery along with today's new reveal.

The Kit
Everything was made from September's Old School Kit, which features retro designs from the Twenty-Three line by Cosmo Cricket and vintage images from Lawn Fawn's Stay Tuned clear stamp set. I heard this kit is sold out, but wait until you see the October kit!

Old School Kit
I grouped this month's projects into two categories.

The Appliance Collection
I made a series of three card which I termed the appliance collection. The first one is up on Paper Made Bakery's blog today. I incorporated the images with sentiments to create a Hello, Sorry and Miss You card. They were all so easy to make, and the stamp set was totally fun to play with. For more information on any project, click on the caption below each photo. 


For this hello card, I love the little note that dropped from the stream of notes.
Hello Card
For this sorry card, I cut out the TV screen and added a printout of a cracked window.
So Sorry Card
For this miss you card, I drew in the electric cord sentiment to the stamped image.
Miss You Card
Who knew appliances matched general sentiments?

The Grid Collection
I made a multi-photo vacation summary layout that held 12 photos with a library card as the journaling pocket. I liked the design so I used it as a card sketch to create the card below. If you like the look of a previously made layout, it is easy to convert it into a card and vice versa. The hard part of determining the placement of the pieces is already done. 

I also made two Silhouette cut files that you can download for your Cameo. 

Silhouette Download Cut File: Rectangular Grid Background
Silhouette Download Cut File: Check it Out Title


Multi-photo Grid Layout
Grid Card

I always have a lot of fun playing with my Fresh Baked Kits. I find it is easier for me to create when using a self-contained kit, that way, I'm not rummaging around and fluctuating between collections.

Please join me along with the rest of the DT on Monday, October 1st, for the reveal of the next kit along with a blog hop and giveaway. Plus Paper Made Bakery has a special announcement to share too.

Thanks so much for stoppin' by,
Wednesday, September 26, 2012

Sweet Stamp Shop: Smash Book

The Event
This week Sweet Stamp Shop is hosting a cross promotion with Epiphany Crafts. The design team is showcasing projects featuring product from both companies. There is also a great giveaway, so be sure to visit Sweet Stamp Shop's blog everyday this week to get some design inspiration and to enter the giveaway worth over $60. 

The Reveal
Today I'm up with a double paged layout in my Smash Book. It is the larger, 11 x 13.5" album, and this is actually the first time I've worked with this album. Since it has more of a casual air, I thought it would be a great place to document my vacation and hold all the memorabilia I accumulated on the trip.


The Details
For the focal point of my layout, I wanted to create an aquarium scene which incorporated my SSS stamps and Epiphany tool. To start, I stamped images from Sweet Stamp Shop's Under the Sea collection onto a strip of white cardstock. I stamped the sea creatures in gray and the seaweed in green, coated them with clear glitter embossing powder and heated it. I wanted a raised outline so it would be easier to color in the images. 


I used Copics to color in the images. I wanted more of a precise coloring job with gradual shading. Here are the colors I used on the seahorses. 


For my water background, I wanted more of an imprecise coloring with random swirls of color. I picked a light, medium and dark blue ink pad and stamped them on my craft sheet. I sprayed the stamped ink with some water. I picked up the colors with a water brush and painted on my background.  This technique yielded a rich blend of colors and added depth to the water.


I also wanted to point out, that when I was stamping, I stamped some popcorn images from the Watchin' TV collection with a clear ink and embossed it in white to create air bubbles, which I colored in with Copics. The popcorn stamp is a long, straight strip of popcorn, so I cut out three of the smaller ones, and stamped them in a curvy pattern instead to simulate movement in the water. 


As a finishing touch, I punched out three flowers using Epiphany's Flower 25 Shape Tool. I covered two of them with Bubble Caps, so there is a glossy dimension to them. I thought the flowers looked like starfish and was the perfect addition to the aquarium. 


Here is the look at the finished page.


I wanted to tie it in to my companion page which holds my photos, journaling and title. One way was to use the same materials. I extended the background orange paper  and washi strips to both sides. Another way was to repeat a pattern. I brought the look of the vertical air bubbles to this side, by interspersing round Epiphany Bubble Caps throughout my journaling and title. 


The Prep
Prior to going on my trip this summer, I participated in the SoCal Shop Hop, so I had a chance to visit some local scrapbooking stores. I picked out my papers beforehand. I figured a blue/orange color scheme would match my eventual photos, so I picked up this summer collection from Echo Park. I also went to a local thrift store and saw this necklace that was in the same color scheme. I pulled off a few charms and added it to my layout. I forgot how much I paid, but I remember thinking it was less than a pack of scrapbooking stickers so I purchased it. So just be on the lookout, you can use lots of things around you for scrapbooking. 


At the end of my tour at Ocean Rider Seahorse Farm, visitors could briefly hold a seahorse. This was the scrappy moment of the trip, but there were some background distractions I wanted to minimize. I masked the foreground and blurred the background, then cropped the photo to let the focus stay on the seahorse. You can read a tutorial on this Photoshop process here


I hope you enjoyed seeing my seahorse layout. Remember to visit today's post at Sweet Stamp Shop or any day this week, to enter the giveaway for some sweet stamps and Epiphany tools. 

Thanks so much for stoppin' by, 

Thursday, September 20, 2012

Paper Made Bakery: I Miss You Card

Hello scrappy friends, happy Thursday! It is time for my weekly sneak peek with Paper Made Bakery.


I just love all the old timey appliances in this month's stamp set, Stay Tuned by Lawn Fawn. There are quite a few ways to incorporate the images with matching sentiments onto a card. I made three cards this month which I call my appliance collection. I'll show the whole set along with all my Old School projects in my monthly summary post on September 27th.


To see the complete card now featuring a lot of fun elements from this month's Old School Kit, please see today's post on Paper Made Bakery's blog.

Thanks so much for stoppin' by,

Thursday, September 13, 2012

Sweet Stamp Shop: Halloween Wall Hanging

The Reveal
This week Sweet Stamp Shop is hosting a cross promotion with Canvas Corp. The design team made projects all week long featuring product from both companies. 

Today I'm up with a Halloween wall hanging I made for my nephew. I really love Canvas Corp's mini clothespins and triangular gift tags. I made that into a mini Halloween banner which is draped onto the exterior of the frame. The photos are recessed so there is some dimension when you see this live. To learn more about this project, or to see all the other projects, please visit Sweet Stamp Shop's blog

Isaiah's Halloween Wall Hanging

My favorite part of this project is the translucent ghost. I stamped it onto tissue paper and added a bit of Copics coloring on the eyes and shoe. When placed on the patterned paper, you can read the background words through its body.

Translucent Ghost
The Supplies
Stamps: Sweet Stamp Shop (Ghost, Mummy, Haunted House)
Cardstock: Canvas Corp
Patterned Paper: Canvas Corp
Tissue Paper: Canvas Corp
Gift Tag: Canvas Corp
Clothespins: Canvas Corp
Hemp Rope: Canvas Corp
Ink: Stampin' Up
Markers: Copics
Jewel: Forever in Time
Frame: Target Home
Other: Screws

I'm also entering this in CutCardStock's fall themed challenge.

The Inspiration
The Halloween project is a companion piece to another wall hanging I had previously made for my niece. Now they each have a framed design to hang in their own room.


Thanks so much for stoppin' by,

Paper Made Bakery: Cross Conversion


Hello scrappy friends, happy Thursday! It is time for my weekly sneak peek with Paper Made Bakery. This month everything is made from their Old School kit

Weekly Sneak Peek
I used my grid layout from last week as a sketch for this week's card. You can easily turn the design of a favorite layout into a card or vice versa. To see the complete card , please see today's post on Paper Made Bakery's blog.

Thanks so much for stoppin' by,

Thursday, September 6, 2012

Paper Made Bakery: Vacation Summary Layout

Hello scrappy friends, happy Thursday! It is time for my weekly sneak peek with Paper Made Bakery

Sneak Peek of Vacation Summary Layout
This week I made a single paged layout that summarizes all the places I visited when I was on the Big Island of Hawaii last month. I found a way to showcase 12 photos and along with the corresponding labels. There are also two free Silhouette downloable cut files that I made that I'm sharing with you. Be sure to "Check it Out", which is also the title of the layout. Be there or be square, or should I say rectangular.

To see the complete layout featuring a lot of fun elements from Cosmo Cricket's 2WENTY-THR3E line, please see today's post on Paper Made Bakery's blog.

Thanks so much for stoppin' by,

Wednesday, September 5, 2012

Sweet Stamp Shop: Dream Ocean Card


The Hop
Welcome to Sweet Stamp Shop's September release hop. There is a different hop each day (Mon. - Wed.) this week featuring a different set of stamps. Today's hop is featuring their underwater themed Dream Ocean set. Here is the blog hop order:

Sweet Stamp Shop
Emily
Kari
Stephanie
Michelle (←you are here)
Kim (←go here next)
Nicole 

The Reveal
I wanted to create an underwater view from the porthole of a submarine. I used a gray piece of patterned paper with the setiment stamped in gray for the foreground and bright colors to draw your eye to the background outside the windows. 

Dream Ocean Card


The Details
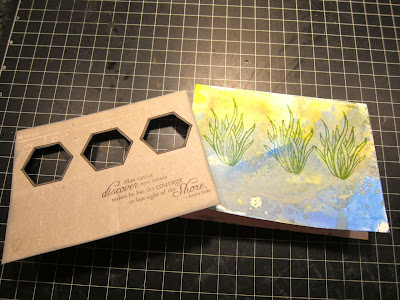
I started with a white cardstock card base. I stamped a craft pad with three colors of ink, sprayed over the ink with some water and dragged the card through the water droplets. You end up with a swirled colored design. I thought this technique which I saw on Kristina Werner's blog would be perfect to achieve an underwater look. 


While the background was drying, I stamped three hexagons from Pattern Craze onto my foreground paper. I cut out the centers with an untility knife. I also stamped on the sentiment from Ocean Dream. 


When the background was dry, I stamped some seaweed from Under the Sea. I placed the images so they could be seen through each window. 


I stamped, colored and cut out some sea creatures from Dream Ocean and Under the Sea. I adhered them to the background, popping up one creature from each pair for some dimension. 


I adhered the forground piece over the top. I added some glitter glue to the sea creatures and Glossy Accents to the exposed background for a wet watery look. 


I hope you have fun playing with your stamps and combining sets. I know I did with this card. 

Your next stop is Kim's blog

Thanks so much for hoppin' by,


Monday, September 3, 2012

Paper Made Bakery: September Reveal + Blog Hop + Giveaway

The Hop:
Welcome to Paper Made Bakery's new September release blog hop. If you've just arrived from Wida's site, then you've come to the right place. If you would like to start from the beginning, please hop on over to Paper Made Bakery's blog. If you are lost, this the blog hop order:

Michelle McClure (←you are here)

The Kit:
September's Fresh Baked Kit entitled Old School features retro designs from the Twenty-Three line by Cosmo Cricket and vintage images from Lawn Fawn's Stay Tuned clear stamp set. I love the subtle colors and throw back designs in this month's kit!


Old School Kit
The Reveal:
When I saw the retro TV set, I immediately thought to break the glass on the screen and make it into a So Sorry card. 


So Sorry Card

The Details:
I stamped the TV onto white cardstock and cut it out. For the screen, I googled broken glass and found an image I wanted to use. I experimented with clear vs. black glass, and the crack showed up better on the black.

Screen Shot of iPhoto
I printed out the image as an 1 x 1" square and added that to the center of the TV and coated the top with Glossy Accents. I punched out a small white circle and drew in some stitching with a red marker to make a baseball which I placed next to the television set. 

TV Set and Baseball

The patterned paper had a receipt image printed on it, so I hand wrote in a bill for a new TV to incorporate in into the design. 

Receipt Background

I wanted a "Sorry" type sentiment and dug through my stash and could only find one set from My Sentiments Exactly! that kind of matched what I wanted to express. They are actually two stems that matched a flower stamp. I realized most sentiments are very peppy, positive or punny and I didn't have any that were more serious. 

Sentiment

I hope you enjoy seeing all the creations from today's hop. Thanks for all your love with your comments. 

The Giveaway:
As a way to say thank you for participating in today's blog hop, Paper Made Bakery is giving a  goodie bag to one lucky participant. You can enter by using the Rafflecopter widget below. The giveaway will end at midnight on Wednesday, September 5th and the winner will be posted on PMB's blog and Facebook page on Thursday, September 6th. 

Good luck to all! Your next stop is Jen's blog. Remember there are daily inspiration projects and tutorials on PMB's blog all month long. 


a Rafflecopter giveaway