Friday, January 27, 2012

New Design Team - Paper Made Bakery!

The Reveal:
I just wanted to share that I am now part of Paper Made Bakery's new design team!

The Overview:
Paper Made Bakery is a monthly kit club that focuses on  stamping and card making, but you can use it for so much more. The kits are so cute and all the embellishments and papers go so well together that all the guess work is taken out of the equation for you. Here is a peek at this month's fresh baked kit.

Paper Made Bakery's January Kit
The Details:
I will be working with next month's kit, which if you are curious, will be revealed next week on February 2nd along with some fun events on the blog. Be sure to stop by and meet all the other design team members and be amazed by their talent. The design team will be revealing a new project each day, all month long using the same kit, so you will never lack a source for inspiration. Check out PMB on Facebook too, as there lies news of the latest giveaways and announcements. 

Thanks so much for stopping by, and I can't wait to share with you my new creations each Wednesday in February.

Happy Scrappin',

Monday, January 23, 2012

Imaginisce January Challenge: Snowman Snowglobe Card

The Reveal:
I've always loved snow globe cards, with that interactive component and movement of the falling snow.  I was very happy that I found the perfect opportunity to make a literal snow globe card. 

Snowman Snow Globe Card

The Challenge:
I saw that the January challenge at Imaginisce was to make a winter themed project as inspired by this photo. 

Inspiration Photo
I really wanted to stick with the blue and white colors, but my Imaginisce winter collection was the Christmas themed Santa's Little Helper, which is primarily red and green. I chose a chipboard sticker that had a blue background, and placed that on a blue background paper from the princess themed Enchanted collection

3D Snow Globe
The Details:
The snow globe itself is packaging from some Bo Bunny buttons. I placed some white glitter, silver star confetti and blue micro beads inside the packaging for the snow. 

I wanted to try a technique I saw online where you stamp and emboss in white onto white cardstock and then mist the paper with the color you want. You then dab off the mist from the embossed areas and the white stamped images remain. That is how I achieved the white snowflakes even after misting over them. 
Santa and His Sleigh
To play on the winter theme, I decided to add Santa in his sleigh flying over the snowman scene. They are cut from the a piece of patterned paper also from the Santa's Little Helper collection.

The Inside:
Even though this is a winter themed card, the next major card giving holiday is Valentine's Day, so I really wanted to find a way to turn this into a Valentine's Day card. The chipboard sticker said, "Cold Nose" next to the snowman on the front of the card. On the inside, I cut the same snowman from the patterned paper and popped him up inside the card. I used the heart shaped Glam Rock and adhered it to the snowman. I hand wrote, "Warm Heart" to play on the idiom, "Cold hands, warm heart."

Inside of Card

So the sentiment reads, "Cold nose, warm heart."

Exterior and Interior of Card
Hope you enjoyed my little card. Thanks for stoppin' by. 

Happy scrappin',


Wednesday, January 18, 2012

I Saved the Date! Layout: Little Cousins do Grow Up

The Reveal:
For once I had a chance to make a project because I was inspired and just wanted to make a page. Usually I make projects for a design team, challenge, holiday or gift. 

My cousin Marrina's Engagement
The Background: 
At Christmas, my cousin, Marrina, gave me a save the date magnet for her upcoming nuptials.  
Save the Date Magnet
I've known her since she was a baby, so my first thought was to still think of her as a young kid, kind of like this Father of the Bride moment. 


My second thoughts were recollections of my then boyfriend, now hubby, Kevin picking up Marrina and her brother up with one hand and tossing them around. (These photos were predigital and had to be scanned from my old fashioned scrapbook, which is kind of like the new Smashbooks.) 

After the realization that little kids do grow up and get married, my third thought turned back to scrapbooking and I thought the magnet was super cute and would make a great focus for a layout. 

The Details:
Sometimes a layout is really laborious to put together and I'm still not quite satisfied at the end, and other times the stars align in the universe, and all the componets readily comes together. This was one of the latter times. During Christmas dinner Marrina was telling me that her wedding colors were teal and salmon. I had just used Authentique's Gathering collection which were those same colors. I had a few scraps left and it was enough to make a one page layout, even though I didn't have any whole sheets left. 

Title & Journaling
I was just reading Sketch Support and really liked the layout sketch of the week (#16). Most of the designers made a Christmas layout, but I thought the ornaments could be transformed into the wicker lanterns in the magnet design.

I handstitched strings to hang the lanterns that I punched from a piece of patterned paper. I even poked holes and stitched through the magnet itself. 


Marrina had posted some gorgeous engagement photos on Facebook. If you need a wedding photographer for the L.A. area, I'd highly recommend the one she used, Anna May Lam.

Engagement Photos
I browsed through her photos and chose the more muted ones that matched my distressed papers. 


The whole layout came together seamlessly. Here's hoping the wedding planning and marriage is the same. I wish you the best kiddo!

Thanks for stoppin' by,


Tuesday, January 17, 2012

Pages Reveal: Cute Lil' Heart Window Card

The Assignment:
Part two of my assignment this month at Pages from the Heart, was to make any type of card I wanted using papers from my kit, which was Authentique's "Gathering" collection. I wanted to play with a different type of fold instead of the standard fold. I saw a card a few months back from Kristina's Werner's blog that used the two halves of the negative space to form the whole shape that I thought was totally adorable. I used that idea as the inspiration for my card.

Heart Window Card
Supply List for Card
Featured Collection: Authentiques’s “Gathering” Collection

Cardstock: Bazzill Basics
Patterned Papers: Authentique
Stickers: Authentique
Ink: ColorBox Chalk
Pen: Pentel
Brads: Making Memories
Other: I hand cut out the hearts

The Details:
This card is made from a base piece of 4 x 12" cardstock. I covered it with a strip of 2 x 12" piece of Authentique's patterned paper and a thin piece of coordinating cardstock. I decorated it with a sticker, a die cut and some brads. I only glued half of the die cut sentiment on the front of the card so that it could still open up. 
Opened View of Card
The fun part is how you fold this card. Going from one edge to the other, I folded the card at 2", 4", 8" and 10" marks. I drew in half a heart along the 2" and 10" folds and cut it out, which opened into a whole heart because of the fold. You can try using a punch also. 

Negative Space Heart
When you fold it back together, the two halves also form a whole heart. This is a quick card to make and you can change it up for other occasions, for example Valentine's Day is coming up. You can also change the shape of the cut out, like into a square and make that a present for a birthday card. The possibilities are endless. I like trying out new shapes and folds for cards, so this was a fun departure from the norm for me. 

Thanks for stopping by and I wish you much scrappiness in your days,

Monday, January 16, 2012

Last ScrapFIT Reveal: It's the Simple Things

The Workout:
Here are the guidelines for January's second workout on ScrapFIT.


Workout #60- It’s The Simple Things
Sometimes it’s the simple things in life that mean the most!  Show us what simple little thing means so very much to you!  Is it a picture your child drew, a family heirloom,  a special recipe or a book? We are dying to know! Join us for this "simple" workout by linking your creation to Mr. Linky at the bottom of today's post by January 31st.  


My Reveal:
I wanted to show that taking time out of the day to stop and spend time with a loved one was one of life's simple pleasures.

Workout #60 - It's the Simple Things
Sometimes you have the photos that match the topic, but this time I had to recreate the moment. Kevin and I took these photos on the front porch using a ladder and the camera's self timer. 

The Details:
Since this was about the simple things in life, I decided to also keep the page relatively clean and simple. This was difficult for me and I had to keep stopping myself from adding more elements and using more colors and patterns. I started by using white as the background and not misting that blank canvas or adding larger patterned paper pieces.
Title Block
I  used pieces from Pebbles' Happy Go Lucky collection, so everything would look cohesive. For the title, I chose a sticker from the collection for a simpler look, instead of having a long multicolored title made from alphabet stickers that I would normally be inclined to do. 
Flower embellishments

I used some flowers from the collection along with some rhinestones that I placed throughout the layout. 

Bird embellishments
It still looked a little barren to me at this point, so I cut out some birds from the patterned papers and place them in three different places along with the rhinestones.


 I stitched a large heart to anchor all the elements together so it didn't look like squares floating in space.

Journaling
The Prize:
Hope you enjoyed my simple little layout. If you have something you want to document, link your creation to this post on ScrapFIT by January 31st, and you just might win the following collection from this month's sponsor, Boys Rule Scrapbook
The Sponsor

The Prize

Thanks for stopping by,


Thursday, January 5, 2012

Pages Reveal: Thanksgiving in Cabo Layout

The Reveal:
For this month's assignment from 
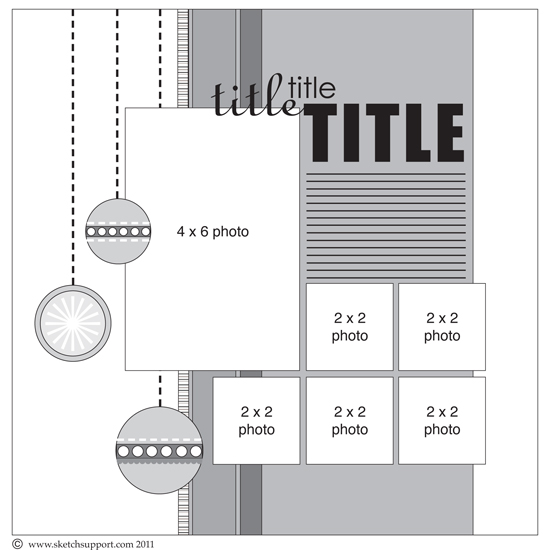
Pages from the Heart, the DT was asked to make a calendar themed single page layout. Instead of putting an actual monthly calendar on my page, I decided to go with a calendar inspired look. I set up my page with a the grid-like design and placed everything inside the mini-boxes: the title, journaling, embellishments and photos.

Thanksgiving in Cabo Layout
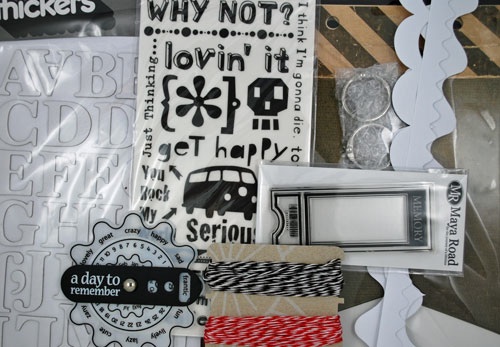
Supply List for "Thanksgiving in Cabo" Layout
Featured Collection: Authentiques’ “Gathering” Collection

Cardstock: Bazzill Basics
Patterned Papers: Authentique
Stickers: Authentique
Alphabet Stickers: Authentique
Ribbon: May Arts
Floss: DMC
Ink: ColorBox Chalk
Dimensional Glaze: Glossy Accents by Inkssentials
Border Punch: EK Success
Strong Liquid Adhesive: Fabri-Tac by Beacon Adhesives
Other: needle, paper piercer, souvenirs (coins, keychain)
Sketch: Allison Davis

The Details:
I received Authentiques' "Gathering" collection to work with, which was filled with beautiful teals and corals, and revolved around a family theme.


I spent this past Thanksgiving in Cabo with my dad and my hubby, and I knew this collection's colors and theme would totally match my photos. The sky and waters were so blue, and the sand and rocks had an orange hue. Plus we happened to be wearing the primary colors in the collection - blue, brown and coral. Note to self, next time pick out the collection first and pack my wardrobe to match for easy vacation scrapping afterwards. 

Camel Riding in Cabo
I had no idea camels were indigenous to Mexico and I found out the camels were brought from the Sahara region and adapted well to Cabo.

I decided to scrap the entire vacation on one layout since my 2011 album is getting quite full by the end of the year, and also, then I can actually get one project completely done. The mini-boxes in a grid design is perfect for summary layouts, like a year in review page or in this case an entire vacation. I also managed to place some souvenirs I collected into the design. I bought a keychain at a super clean and modern Walmart there. I just took off the latch and chain part and tied a ribbon at the top. I tried my best to spend all my remaining pesos at the airport and ended up with only two coins left, which I knew where they would go.


Souvenirs
I decided to hand stitch the grid lines and I have to admit it took hours. But once you start, you can't go back on a decision. In order to balance out all those stitched lines, I stitched around the main word in the title and I also stitched some French knots for embellishments. I connected the knots with a pen to form a branch to mimic the branches I cut out from a die cut piece in the collection.

Title Block

Using a calendar design made this a very full and very balanced layout. I really enjoyed filling in every box and recording all my memories onto one page. 

I had a few scraps leftover and made another page which I will be sharing very shortly. 

Take care and I hope you are still striving towards your resolutions,


Sunday, January 1, 2012

ScrapFIT Reveal: Love is a Battlefield

The Workout:
This is my last month on ScrapFIT as my term is quickly drawing to a close, and this is my second to last reveal. I have to say I found all the challenges very interesting it made me create things I normally wouldn't have made. Here is the latest challenge as posted today on ScrapFIT:

#59- Be Inspired By The Music! 
"I love 80’s music and we are working out with Pat Benatar this week!  Her song ‘Love Is A Battlefield ‘ is your inspiration for this workout!  I can't wait to see how this makes you move!  You can find the lyrics hereNow its your turn to show us how this song makes you move!  Link up your layout or card to Mr. Linky by January 31st for a chance to win!"

My Reveal:
I read through the lyrics of the song, watched the video and then read some articles about it.  It was very different from what I remembered as a kid when I watched the video back in the early 80s. I didn't have any photos about teenage rebellion, so I went in a different direction.

Workout #59 -  War is a Battlefield
My sister sent me these photos of my nephew participating in Jedi training at Disneyland. It is like a mini-show where they choose kids from the audience, let them borrow a Jedi robe and light saber, and teach them some fighting techniques. At the end they battle Darth Vader or Darth Maul. 

The Details:
In terms of the challenge, I changed love into war, sorry, and placed a main star in front of the title, so the title actually reads (Star) War is a Battlefield, sorry also for incorrect subject verb agreement but it can't be helped. I cut out a yellow star and layered it on top of a black one for a shadow effect. I then stitched silver embroidery floss around the layered stars to tie in the silver metal star pendant I glued on top. The silver star is from Prima Marketing and looks like a piece of jewelry. It even has the hole for a chain so I tied a piece of ribbon there to make it look more like an embellishment. 
Title - (Star) War is a Battlefield
I used a travel themed collection from Imaginisce called Bon Voyage which has a masculine color scheme. Also the compass points in the patterned paper looked like stars to me so I thought it tied in nicely with my theme. Besides the patterned papers, I also utilized the matching die cut sheet. I liked a tiny die cut that said, "Welcome to our land, you are now in" and I added Tomorrow Land which is the location of the Jedi training. 


There was also a larger die cut entitled "Day Pass" which was perfect for my journaling block, it reminded me of the entrance pass. I actually made this layout when I was at an all day crop and I was sitting next to my friend Becky who had a tower of brads. One layer had star brads and she graciously gave me some, so the itty bitty gray stars are from her collection. The layout design is based from a sketch from Allison Davis' one page layout sketchbook, but you can find other sketches designed by her here


The Prize:
The prize for this month's workout is sponsored by Boys Rule Scrapbooks Kits which is a monthly scrapbook kit club for those who love to paper craft boy subjects. 
This month's sponsor
The actual prize is pictured below. 
The month's prize

Thanks for stopping by and I wish you a wonderful new year,